Time tracking
Introduction
You can configure the time tracking to meet your company’s needs. In the system administration -> Time and expense registrations -> Time tracking setup You here decide which features should be available for you in the time tracking.
Description
Remember that the settings are applicable for all users in the system. We overall have four sections you need to look at:
- Time tracking features and requirements
- Total section and flex calculation
- TimeLog Tracker
- Configuration of user-defined comment field
Time tracking features and requirements
Time format
Here you first need to decide which format you would like to track time in. The format is used for all calculations of e.g. flex and billable values of time registrations. You can select between decimal numbers (e.g. 1.5) and time (e.g. 1:30). We recommend that you select the format that matches your company best. We use decimal numbers, as the same format is used in the reporting.
Which format should I choose?
Our experience tells us that it is easiest for the users to track time in minutes, as it is more natural and transparent for each individual to enter how many hours and minutes (s)he has worked on a task. The personal reports and salary reports will be shown in minutes, where all other reports will be shown in decimal numbers. Please note: This may cause confusion for users with access to several report categories.
The benefit of tracking time in decimal numbers is that your reporting is easy to read, the totals are transparent and you have the option to do calculations without first converting numbers between the two formats. If you make use of our apps for time tracking, the registrations will count in minutes and be converted to decimal numbers automatically when the registrations are stopped.
When you select you format, you need to take into account if it should be easier for your employees to track time, or if it should be easy to read your reporting and compare data across reports.
Converting between the formats
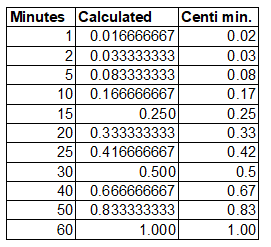
The formula for converting from time to decimal numbers is (no. of minutes / 60) x 100. Please note: TimeLog rounds to the nearest two decimals.
We here show you a few examples of how it is calculated:
Configuration of time tracking
Here you may e.g. select that your employees can track time via the stop watch in TimeLog’s time tracking clients. It can help you to a more exact time registration on your tasks and projects.
All employees can download and use the desktop app TimeLog Tracker and enable stop watch in the personal settings in the timesheet.
Here you can also select that comments should be added to all time registrations. It can be an advantage, if you need comments for all registrations on customer projects. If you select this setting, the employees will not be able to save their registrations without adding comments to them first.
If you have employees who typically work the same number of hours on the same time, it can be an advantage for you to mark the option to copy last week’s time registrations. Then they save time, when they do their time tracking.
If you use milestones on your projects, you can here select that the employees should be able to see them in their timesheets. It provides a quick and easy overview of future milestones (deadlines), and they can complete them directly from the timesheet.
Rounding of time registrations
If you have Invoicing Advanced, you have the option to enable rounding of time registrations and invoice more hours. The system automatically does the calculation, and you do not need to double check the registrations when doing your invoicing.
If you enable rounding of time registrations, it will take effect on all your billable hours. TimeLog will still differentiate between salaried time (the hours the employees track) and the billable hours, even though the single registrations are rounded.
Overtime factor
With Invoicing Advanced, you have the option to enable overtime factor on time registrations. The functionality automatically does a calculation, where the hourly rate is multiplied by the factor you select on the time registration in the timesheet. The overtime factor is a great feature, if you e.g. perform work outside normal working hours, which you would like to invoice at a higher hourly rate.
Here in the system administration, you select which factors, you would like to work with. The number 100 must be included, and you cannot select decimal numbers.
An example: If you have an hourly rate of 100 EUR and you select a factor of 150%, the hourly rate will be 150 EUR for that time registration.
When you enable the factor, you will also see it in your reporting, e.g. in the data extraction report Time registrations (NEW).
Default settings for timesheet views
As an administrator, you can select which views your employees should have available in the timesheet.
- Show all: Shows all tasks the employees have access to track time on
- Show favourites only: Shows all tasks the employees mark as favourites themselves + tasks with registrations within the selected period
- Show tasks with hours: Shows tasks with registrations within the selected period
- My project assignments: Shows the tasks the employees are allocated to + tasks with registrations within the selected period
You also have the option to select which view you want as default for new users you create in the system. Please note that if you select Show favourites only, the timesheet will be empty, even though you’ve allocated your employees to projects and tasks.
Total section and flex calculation
You here select, if your normal working time and flex calculation should be showed in the timesheet. Please note: If you make use of salary groups, you make this setup on the single salary groups.
You also select from when the flex is calculated (today, yesterday, Sunday last week), so when the employees enter the timesheet, the flex balance they see here will be calculated based on your selection.
See how easy it is to track your time with TimeLog
Time tracking with Outlook
You can also enable the option to use Outlook for your time tracking. Please note: The Tracker for Outlook is an add-on module.
Configuration of user-defined comment field
You can enable this functionality, if you need an additional comment field for your time registrations besides the default one. You may e.g. have customers who demand extra documentation on the single time registrations.
You decide yourself how to name the user-defined comment field, as it can be used to cover your specific needs.
Under Validation, you select if it should be mandatory to enter the comment field or if it should be something you decide on tasks level on your projects.
You have two options for what can be tracked in the field:
- All characters allowed – Here you can write both sentences and numbers.
- Whole numbers only – Here it will be only be possible to enter whole numbers and no text or decimal numbers. This is useful, if you e.g. need to report the number of units per time registration, and it makes it easy to extract to Excel or pivot reports.
In the Use when invoicing section, you set up how you would like to use the user-defined comments when invoicing.
Please give it a thumbs up or down.
Please write a comment.