Do you want to save time on project creation, make sure you include the right pricing AND improve your data quality? You can use the hourly rates setup and project templates in TimeLog. Read more about it below. 👇
Do you recognise these pains?
You spend many hours to set up projects
Every time you set up a project, you need to start from scratch and select the hourly rates for every task separately. 🥵
In addition, you don't know what happens in other projects or if specific agreements are in place for selected customers.
You have many errors in the invoicing process
You spend a lot of time to double check each registration for the correct hourly rate, communicate needed changes to the project managers and check if the projects are in the right currencies.
This causes delays and sometimes incorrect invoices go out to your customers. 💸
You can't handle standard vs negotiated prices
It's a challenge for you to handle both a standard set of hourly rates AND special deals with specific customers. 🤝
You can't provide accurate estimations for new projects without the correct setup. And without the right estimations, you can't give the right price in your offers on new projects.
With hourly rates you get these benefits
Project manager
1. Flexible setup and hourly rates maintenance
2. Standardise project setup with hourly rates in project templates
3. Save time on project creation and include pricing agreements automatically
Bookkeeper
1. Better quality assurance across all customers
2. Smooth invoicing process with less internal communication
3. Significant time savings on communication flows and manual changes
CFO
1. Easy indexation of price lists and hourly rates
2. Transparency in financial reporting
3. Visualisation of deviations on customer, project and contract level
What happens, if I don't make a selection?
The system helps you out
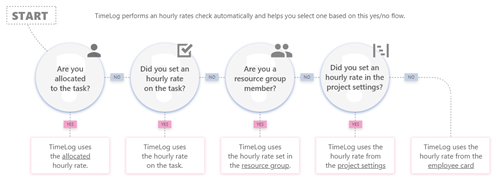
The system performs an hourly rate check every time an employee tracks time on a task in this order:

We recommend you check the settings on your current projects and employee cards to make sure you have the correct hourly rates in place.
What about customer specific hourly rates and price groups in different currencies?
If you set up customer price lists, you see these hourly rates in the selection lists as well. You can read how to set them up below.
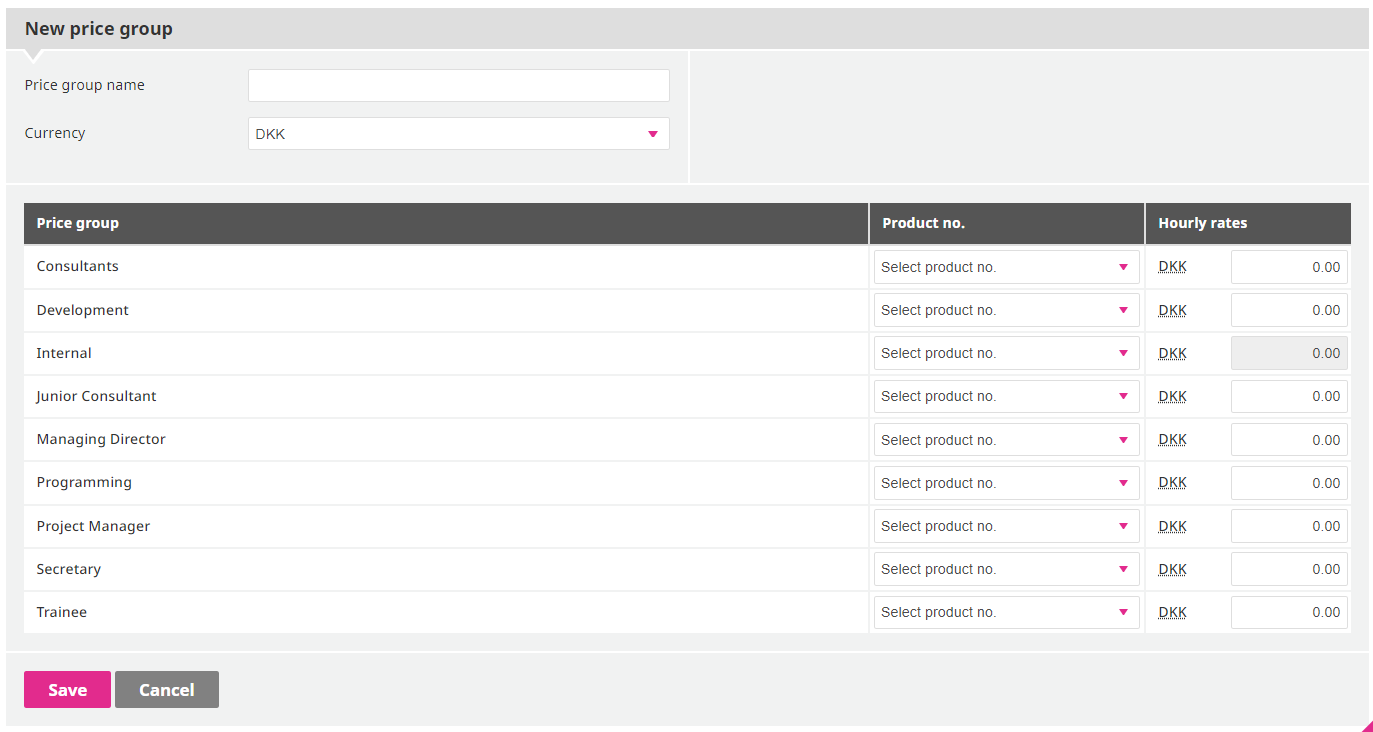
The hourly rates you see in your selection lists are based on the price group and currency setup you make in the system administration. You always need to set up a new price group, if you want to create proejcts in different currencies.
When you create a new price group, you need to add a price for all the hourly rates no matter which currency you select. You can select between the currencies you activate in the system administration.
When to use hourly rates at different levels
1. Employee card
You must select a standard hourly rate when you create a new employee. Select the one that is most relevant to the role or tasks the employee performs. It'll help you, when you allocate your emoloyee to projects.
2. Project
If all or most work on the project is at the same price, select the hourly rate in the project settings when you create the project. Then new tasks automatically get this hourly rate.
Example: You sell your implementation at a fixed hourly rate, but bill the travel costs at a separate hourly rate.
3. Resource groups
If the work the employee does in this project differs from the standard hourly rate, select a different one in the resource group. This hourly rate overwrites the one set in the project settings when you allocate employees to tasks.
Example: The employee usually works as developer, but in this project mainly as tester and requires a different hourly rate.
4. Task
If all or most work on the task is at a different price than the one set in the project settings or the resource group, select the hourly rate when you create the task. Then new allocations and registrations automatically get this hourly rate.
Example: If you have a special rate for travel time, you can create a travel time task and add the specific price.
5. Allocation
You have the option to select a specific hourly rate when you allocate an employee to a task.
This hourly rate will overwrite all other settings, and all registrations will get this value.
If your colleagues have already tracked time on a task, they are automatically allocated.
Example: You want to differentiate between junior and senior resources and select different hourly rates.
You're ready!
If you follow these steps, you ensure automatic selection of the correct hourly rate 95% of the time.
When you in addition use project templates for your most common project setups, you improve the data quality and time savings even more.
Now you’re ready for the setup
Hourly rates on more levels
You can work with the the hourly rates on three levels:
1. Standard hourly rates available to use for all customers
2. Customer specific hourly rates with price lists for selected customers
3. Project specific hourly rates you can add to contracts on selected projects
Once you start you work with hourly rates, you will find them in several places across the system:
- Employee card
- Project settings
- Resource group
- Tasks
- Allocations
- Contracts
- Listed on invoices and in reports
Definitions
- Standard hourly rate: A price available to add on all tasks and employees no matter which customer the project links to
- Customer specific hourly rate: A price only available on projects for the customer you create a different price list for
- Project specific hourly rate: A price only available on the specific contract you add it to in a project
- Price list: A set of standard of customer specific hourly rates you can select from in your projects
Recommendations
1. Add a standard set of hourly rates applicable for all customers based on either the services you offer or the roles you have in your projects
2. Add customer specific price lists, if you have long-lasting relations with customers, who have agreements with prices different from your standard hourly rates that apply to their projects in general
3. Use the project specific hourly rates on project contracts to handle minor deviations on specific project deliveries
4. Set up project templates for your most common projects and add the hourly rates as well. This helps you save time and improve the data quality
Get a detailed explanation of how the hourly rates work in TimeLog from our Head of Product Management, Christoffer Lanstorp.
1. Set up standard hourly rates
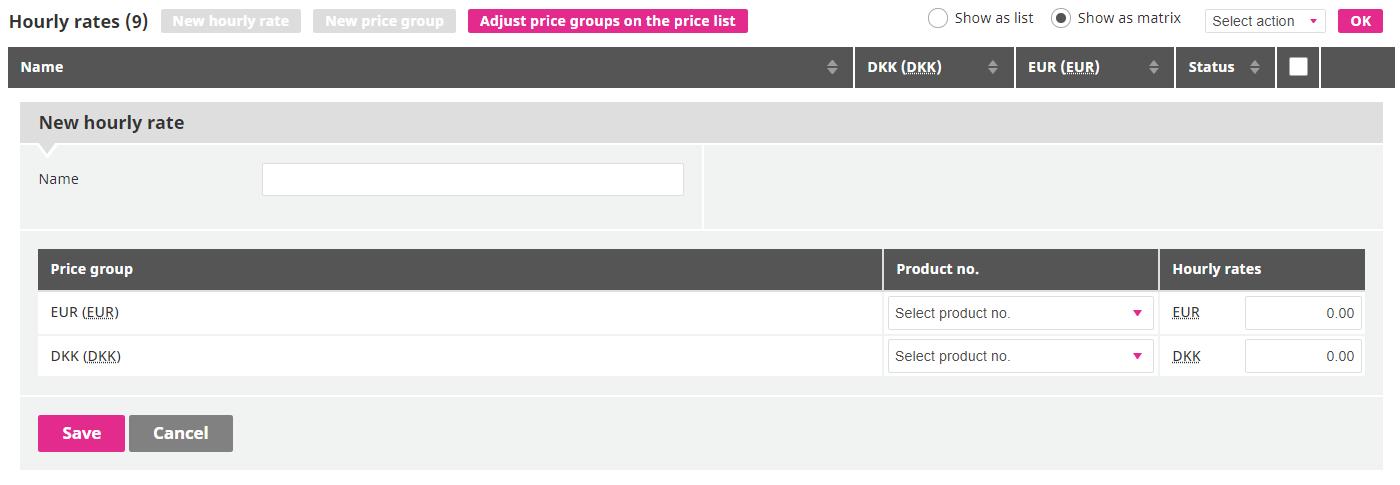
1. Go to the System administration -> Finance -> Hourly rates
2. Click New hourly rate
3. Enter Name
4. Enter amount
5. Click Save
Repeat the steps until you have your standard price list.
If you have more price groups, you must add an amount per hourly rate in each group.
Remember to select a standard hourly rate on each employee card, once the standard hourly rates are done.

2. Set up customer price lists
1. Go to the System administration -> Finance -> Hourly rates
2. Click the plus next to the Price list menu
3. Select you customer
4. Select which price group to copy hourly rates from
5. Click Save
Repeat the steps until you have all the customer price lists you need.

3. Manage your project contracts
1. Open you project
2. Click the Finances tab
3. Find and open the right contract
4. Click New hourly rate
5. Enter Hourly rate name and Rate
6. Select a Product no., if you use a finance integration
7. Select Add as project hourly rate
8. Click Save
See how you do it in our how to video:
We’re ready to help
Any questions? 🙋♀️🙋♂️
If you’re in doubt about anything, you can always start a chat with our Customer Success team, which is ready to help you on all Danish work days between 8 AM and 4 PM.
And you can read more in our FAQ about hourly rates.
