Timestamps
Introduction
In this help text, we will show you how to use and activate our feature Timestamps.
Description
How do I activate Timestamps?
First, you need to have access to the System administration.
To activate it, you need to go to System administration -> Time and expense registrations -> Time tracking setup.

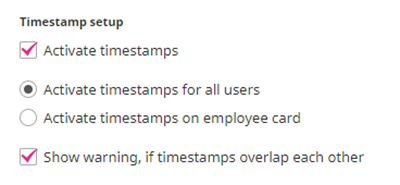
Here you will have two options:
- Activate timestamps for all users – this makes the feature mandatory for all users.
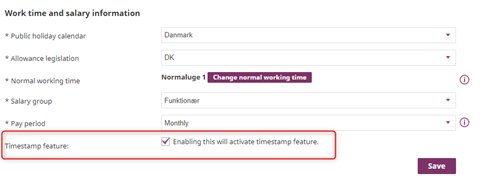
- Activate timestamps on employee card – this gives the managers the option to make timestamps mandatory for selected employees. You can do this on the employee card:
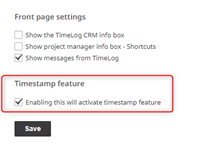
For users, where Timestamps are not mandatory, they have the option to activate it themselves, under “Profile & Preferences”:
When the feature is activated, the user can use Timestamps when tracking time in the timesheet:
- If you want to use the Stopwatch, we automatically add the Timestamps to the registration.
- In the report “Time registrations (new)”, we have added the option to see Timestamps and extract them to an excel file:

Timestamps in the Desktop tracker:
Timestamps, in our Desktop tracker, work in the same way as it does in TimeLog for web. Simply, type the start time and press play, or type in your start time and the end time right away.
Special remarks
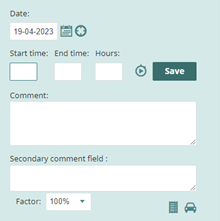
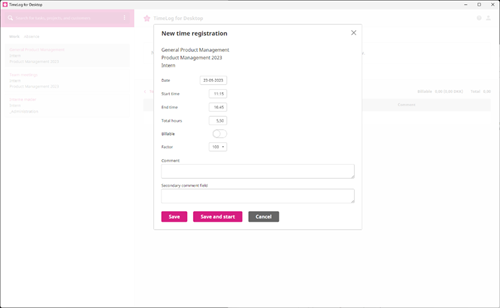
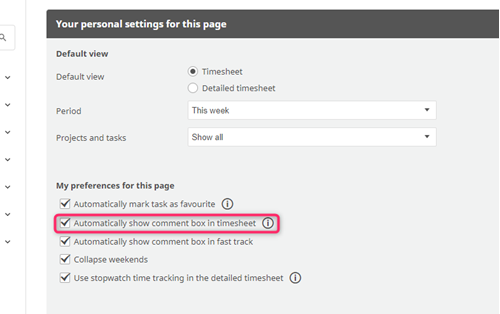
If you want to register time directly in your timesheet in TimeLog, you must activate the comment box to automatically show. This is done under Page settings --> Register --> Time.
After you have marked the checkbox, the comment box will automatically appear, when you register your hours (see picture below).
 NOTE: Make sure the Start and End time are correct, as they as a default will be based on the current time that you register, and are therefore not necessarily the correct timestamp.
Logic of Timestamps described
Timestamp logic is a way to track time periods in a simple and flexible manner. Here's an easy-to-understand explanation of the three logics:
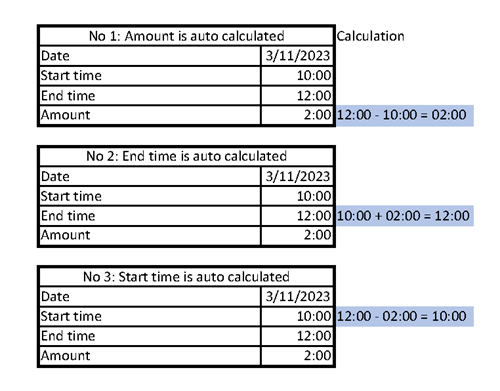
Logic 1: Only adding amount
- When you provide only the "amount" of time, the system assumes the current time as the "end time."
- The "start time" is calculated by subtracting the "amount" from the "end time." For example, if you input 2 hours at 12:00, the "end time" will be 12:00, and the "start time" will be 10:00.
Logic 2: The user adds start and end time
- If you specify both the "start time" and "end time," the system calculates the "amount" of time between them. For example, if you say the "start time" is 10:00 and the "end time" is 12:00, the system will determine that the duration is 2 hours.
Logic 3: The user adds start time and amount
- When you input a "start time" and an "amount," the system calculates the "end time" based on this information.
- For instance, if you set the "start time" to 10:00 and the "amount" to 2 hours, the system will add the "amount" to the "start time" to determine the "end time," which will be 12:00.
In summary, this timestamp logic allows you to work with time in a way that suits your needs. You can either specify a duration ("amount") and let the system calculate the start and end times, or you can provide the start and end times and have the system compute the duration for you.
Logic 4: StopwatchWhen using a stopwatch, there are two scenarios:
- Start and Stop Stopwatch:
- If the user starts the stopwatch, the moment they press "start" becomes the "start time."
- When they press "stop," that moment becomes the "end time."
- The "amount" is then calculated based on the "start time" and "end time." For example, if you start the stopwatch at 10:00 and stop it at 10:30, the "start time" is 10:00, the "end time" is 10:30, and the "amount" is 30 minutes.
- Stopwatch with Pre-added Time:
- If the user starts a stopwatch with some time (e.g., 30 minutes) already added, the "start time" will be the moment they press the stopwatch minus the pre-added time (e.g., 30 minutes).
- The "end time" is determined when the user presses "stop" on the stopwatch.
- The "amount" is then calculated based on the adjusted "start time" and "end time." For example, if you start the stopwatch at 10:15 with 30 minutes already added, the "start time" is 9:45 (10:15 - 30 minutes), and the "end time" is the moment you press "stop." The "amount" is calculated based on these times.
This logic allows you to use a stopwatch for tracking time periods, whether starting from scratch or with some pre-added time, and then calculate the duration based on your actions with the stopwatch.
Please give it a thumbs up or down.
Please write a comment.