Björn Lundén
Introduction
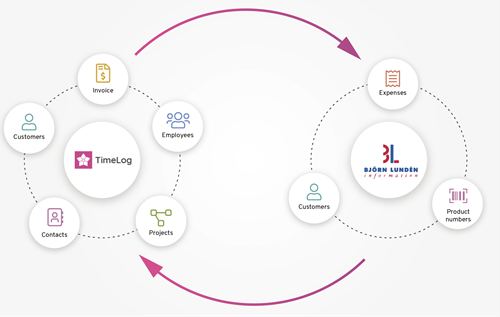
The integration between TimeLog and Björn Lundén provides seamless cooperation between the two systems.
Description
From TimeLog to Björn Lundén:
- Automatic transfer of customers
- Automatic transfer of invoices
- Automatic transfer of projects
From Björn Lundén to TimeLog:
- Synchronisation of customers
- Synchronisation of product numbers
- Easy transfer of expenses via Import of project expenses
This also takes place:
- Update of customer information in Björn Lundén
- Invoice balancing between the two systems
The integration brings a lot of advantages.
- TimeLog is more suited to drawing up invoices based on time data than Björn Lundén.
- Financial analyses can be carried out in TimeLog with every available dimension (employee, project type, project category, department, etc.) incl. the financial reporting
- Project managers can retrieve all information related to invoicing in TimeLog and therefore do not need to access Björn Lundén, which saves you money on licences
- The transfer of invoices to Björn Lundén saves time and provides an increased quality assurance around your invoicing
You start the setup in the system administration -> Integrations & API -> Integrations.
Connection setup
Once you have added Björn Lundén, you need to enter the public key from Björn Lundén. To get the key, you need to follow these steps in Björn Lundén:
- Click Arkiv in the top left corner
- Click BL Integration
- Find TimeLog and click Aktivera and then Ja, påbörja integrationen
- Click the gears icon
- This gives you the key you need to set up the integration. Copy it and enter it in TimeLog
Once you have entered the key, you click Connect to establish the connection.
Once the connection is created and the integration is active, you will see two green checkmarks in this section.
Customer setup
To be able to use the integration, you must first link the customer databases in the two systems, and then you need to select how you would like to maintain your customer data. In general, we recommend you use TimeLog as master for your customer database to have as little maintenance work as possible.
Linking customer databases
To transfer invoices, the customer listed on the invoice must be available in Björn Lundén. Click Link customers to get started. This change the view to four tabs:
- One match: Customer pairs which are readily recognisable
- More matches: Björn Lundén customers with several matches in TimeLog
- No match: Björn Lundén customers with no matches in TimeLog
- Ignored customers: Customers in Björn Lundén not needed in TimeLog (you can ignore customers on each tab, which you can read more about below the four scenarios for linking customers)
On all four tabs, it is possible to link the customer information in four ways:
- Link and use data from TimeLog: This action links customer pairs, overwriting customer data in Björn Lundén with those of TimeLog. Fields left empty in TimeLog will not be overwritten in TimeLog.
- Transfer and use data from Björn Lundén: This action links customer pairs, overwriting customer data in Björn Lundén with those of TimeLog. Fields left empty in TimeLog will not be transferred.
- Import as a new customer in TimeLog: This action creates a new customer in TimeLog based on Björn Lundén data.
- Ignore customer(s): This actions ignores customers from Björn Lundén and add them to their own tab
Once you have imported the new customers in TimeLog, we recommend that you correct your customer number series in the System administration -> General settings -> Number series, so the new customers you create in TimeLog get a customer number continuing the series from Björn Lundén. In this way, the customer numbers in the two systems will be the same when creating new customers in TimeLog.
Please note: To transfer customers from TimeLog to Björn Lundén and link customer pairs, the customer number in TimeLog must only consist of numbers, as Björn Lundén does not accept special characters or letters in the customer number. The customer number can be up to nine numbers.
The linking procedure depends on one of the typical scenarios below:
- No customer data in Björn Lundén or TimeLog
- Customer data in Björn Lundén and none in TimeLog (new TimeLog customer)
- Customer data in TimeLog and none in Björn Lundén (new Björn Lundén customer)
- Customer data in TimeLog and Björn Lundén
The four scenarios are detailed in the following.
Scenario 1: No customer data in Björn Lundén or TimeLog
In this case, linking customer databases is not necessary, so you can skip this step. Customers will be created continuously in Björn Lundén, by linking with the TimeLog customer database or in connection with your invoice transfer.
Scenario 2: Customer data in Björn Lundén and none in TimeLog
Begin by transferring the relevant Björn Lundén customers to TimeLog. The tabs One match and More matches will be empty, and you can skip these. All Björn Lundén customers are shown in the No match tab. Mark the customers you would like to create in TimeLog and select Import to TimeLog as new customer under Select action and click OK.
The customers are now created in TimeLog and linked to their matches in the Björn Lundén customer database.
Scenario 3: Customer data in TimeLog and none in Björn Lundén
In this case, linking customer databases is not necessary, so you can skip this step. Customers will be created continuously in Björn Lundén, by linking the TimeLog customer from the customer card or in connection with your invoice transfer.
Scenario 4: Customer data in TimeLog and Björn Lundén
This linking is the most time consuming, as you will need to manually link each customer pair. Luckily, the system helps you find matching customer pairs.
Please note that if you have many customers in either TimeLog or Björn Lundén, only the first 200 will be shown, and the list can be updated by clicking the little arrow next to the number of customers.
Once you are done linking the customers, you click Back to integration configuration to continue your setup of the integration.
Ignore customers
You have the option to ignore customers from Björn Lundén, which you not need in TimeLog, in all three tabs with match suggestions for linking customers.
You ignore by marking the customers in the checkboxes to the right and select Ignore customer(s) in the Select action menu. Then you can load more customers from Björn Lundén.
When you ignore the customers, they are moved to the Ignored customers tab, where you can get a total overview. From here, you have the option to import or link the, if you need them at a later point in time.
Maintenance of customer databases
You have three options to choose from when it comes to the ongoing maintenance of your customer databases.
- Is done manually on customers in TimeLog
- Happens automatically when transferring the first invoice (recommended)
- Creation in Björn Lundén and manual import via Link customers
1. Is done manually on customers in TimeLog
If you select this option, you can transfer your customer manually from TimeLog to Björn Lundén via the lightning on the customer card. Here you select Link customer with integration, which opens a pop-up, where you click the grey dot to make the link. The system will ask you to confirm that you would like to create the customer, and you click OK.
You can remove the linking in the same way by finding the customer in question and using the lightning icon. This opens the same pop-up, where you now have the option to remove the checkmark to break the link. Afterwards, you can check the integration log to see if the action was successful.
2. Happens automatically when transferring the first invoice (recommended)
When you select this option, your new customers in TimeLog will be transferred and created automatically in Björn Lundén when you transfer the first invoice for the customer.
We recommend this form, as it gives you the least administration, you avoid manual maintenance and you can invoice your customers much faster.
3. Creation in Björn Lundén and manual import via Link customers
No matter which option you select in TimeLog, you must use the Link customers interface to import customer to TimeLog, if you create a customer in Björn Lundén first. If you create the customer both in TimeLog and Björn Lundén without linking them, you risk that the invoice is not transferred correctly or that you have duplicated customer pairs.
If you change the customer number in Björn Lundén, you will experience errors on the integration, when you transfer invoices the next time.
Importing product numbers
Start by clicking the Import product numbers link. A list of active product numbers in Björn Lundén are loaded, and you can mark the product numbers you would like to use in TimeLog. Select the Activate action and click OK.
Configuration of product numbers
An important element in the integration between TimeLog and Björn Lundén is the creation of a product number catalogue in TimeLog. Björn Lundén demands that each invoice line has a product number attached, which decides how the invoice line is booked in relation to the yearly books with VAT and revenue statistics. You cannot book the invoice in TimeLog, if you have not selected a product number for each invoice line, and only booked invoices can be transferred to Björn Lundén.
The product number setup is carried out in TimeLog and consists of the following steps:
- Configuring default product numbers for project work and external expenses
- Adding product numbers to each of TimeLog’s different data types
The integration may work despite the setup of default standard numbers not being completed. If this is the case, manually select a number for each invoice line when creating an invoice in TimeLog.
We recommend a setup of default product numbers, as you will save a lot of time in your invoicing process, when the right product number is added to the invoice lines already when they are created on the invoice draft. It is especially a big advantage, if you are many people sharing the invoicing responsibility. The setup of default product numbers strengthen the data quality in your reporting and yearly books, and you save time as you do not need to double check each other’s work.
1. Configuring default product numbers for project work and external expenses
To expedite invoicing, you can configure TimeLog to suggest product numbers for invoice lines based on the data to be invoiced. For each data type and settlement form in TimeLog, you can select default product numbers. You also have the option to select, if product numbers should be selected when invoicing, or you can select a specific product number for each data type in TimeLog.
2. Adding product numbers to each of TimeLog’s different data types
When you have selected the default product numbers, you can move on to selecting which product numbers should suggest which data. After this setup, you have different options to the right. Click e.g. Link product numbers to hourly rates. In Hourly rates, you will find a new column, Product number. Click the name of an hourly rate, or click Edit and select a product number. The same product number can be used for multiple hourly rates. If you cannot select a single product number for an hourly rate, simply omit it and select a product number on each single invoice line.
When adding a product number to the different data types, you have three options: Select when invoicing, Select dimension or one of the imported product numbers
- Select when invoicing: Here the product number is selected on each single invoice line when you build your invoices
- Select dimension: Here the selected dimension must be updated in the system administration via the link to the right
- If you select a specific product number: The product number is automatically added to invoice lines containing the data type
If you have e.g. selected Hourly rate for the data type Time & material, you need to add a product number for each of the hourly rates in the System administration -> Finance -> Hourly rates. Click Link product numbers to hourly rates, select the name of an hourly rate, or click Edit and select a product number. The same product number can be used for multiple hourly rates. If you cannot select a single product number for an hourly rate, simply omit it and select a product number on each single invoice line.
If you have selected Project type, Project category, Expense type or Task type, you do the product number selection in the System administration -> Finance -> Linking product numbers by clicking the link to the right. Here you select the data type in the top filter, and you select a product number per unit in the list.
The same product number can be used for multiple dimension names.
Click Back to integration configuration to return and continue to the next type.
Import expenses from Björn Lundén
You can import expenses from Björn Lundén to TimeLog by flagging specific Björn Lundén voucher series and accounts. All expenses added to the voucher series and accounts can be imported to TimeLog via the Import of project expenses page, and you can add them to your projects to get a total overview of your project finances. You thereby get the option to add the imported expenses to the invoice drafts in TimeLog.
Transfer projects to Björn Lundén
When you create a project in TimeLog, the project number can be automatically transferred to Björn Lundén.
The advantages of transferring the project numbers is that you can add the project number to your expenses in Björn Lundén, which will be automatically added in TimeLog when the expenses are imported via the Import of project expenses page.
Export expenses to Björn Lundén
You have the option to transfer the expenses your employees add in TimeLog, e.g. via our Mobile app, to Björn Lundén. If you enable this function, you need to decide which journal you would like to add the expenses to. To be able to transfer the expenses, you must add the corresponding account number from Björn Lundén on each expense type in TimeLog. You do this in the System administration -> Time and expense registrations -> Expense types. Remember to provide access to the transfer of expenses via the role management under Employees.
Confirm integration setup
You complete the setup by confirming you have been through and completed all steps in the setup. See it as a checklist to make sure you have done everything. In particular, lacking configurations in linking customers may result in TimeLog creating customers in Björn Lundén which are already there.
Mark the checkboxes, click Activate and the integration is completed.
Please give it a thumbs up or down.
Please write a comment.