Fortnox finance integration
Introduction
The financial integration between TimeLog and Fortnox provides seamless cooperation between the two systems.
Description
The Fortnox integration brings a lot of advantages.
- Easy and quick creation of invoices, based on project registrations.
- Financial analyses can be carried out in TimeLog with all available dimensions (employee, project type, project category, department, etc.) incl. the financial reporting.
- The project managers can find all information about invoicing in TimeLog and therefore do not need access to Fortnox, so you save money on licenses.
- The transfer of invoices to Fortnox saves time and provides increased quality assurance around correct invoicing.
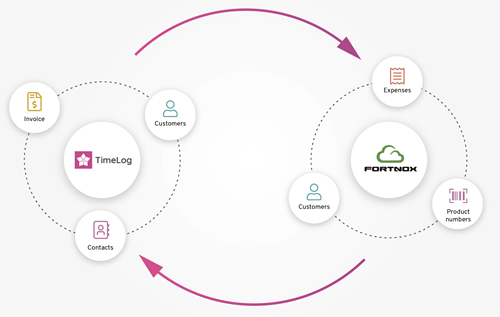
From TimeLog to Fortnox:
- Automatic transfer of new and updated customers
- Automatic transfer of contacts
- Automatic transfer of internal reference
- Automatic transfer of invoices
- Automatic transfer of invoice specification
- Automatic transfer of projects
- Transfer of project expenses incl. image
From Fortnox to TimeLog:
- Import of customers incl. customer number
- Import of product numbers
- Easy import of vendor invoices via Import of project expenses
- Automatic balancing of invoices when marked as paid in Fortnox
Installation of the Fortnox integration
Before you start creating the integration, you must have a TimeLog PSA site with Invoicing. Once that is in place, you need to be system administrator in Fortnox and TimeLog to be able to establish the connection.
Establish the Integration connection
- Add the Fortnox app in TimeLog System administration >> Integrations and API >> Integrations
- Click on Configure Fortnox
- Click on Connect and login to your Fortnox installation.
- Accept the TimeLog access criteria’s and close the pop-up window.
When the connection is established, click Close this window in the pop-up window and a check mark appears next to Connection established, and you are now ready to configure the integration.
Please note: Fortnox has a limit on the number of characters that can be received from TimeLog. The document Data transfer between TimeLog and Fortnox gives you an overview of the data transfer and limits.
Step 1 – Setup
General configuration
Checkmark “Use the customer no. from TimeLog when transferring a customer to Fortnox” if you want the use the TimeLog customer number series when transferring new customers from TimeLog to Fortnox.
Configuration of customer data owner
You have two options to choose from when it comes to the ongoing maintenance of your customer database.
- Customers are created in TimeLog and synchronized to Fortnox when transferring invoices (TimeLog is master for new customers)
- Customers are created in Fortnox and manually imported to TimeLog (Fortnox is the master for new customers)
If you choose option 2, you can extend TimeLog’s functionality by check marking “Allow TimeLog to automatically link customers with matching VAT number or Org-/Personal number and create customer contacts when transferring invoices to Fortnox”
1 Customers are created in TimeLog
When choosing this option, is all new customers and customer information updates to be done in TimeLog.
New TimeLog customers is transferred and created in Fortnox when transferring the first invoice, and the customer is getting linked. The new Fortnox customer will get the TimeLog customer number added if activated. Otherwise will the new Fortnox customer get the next number from the Fortnox customer number series.
Updated TimeLog customer information is transferred to the linked Fortnox when saved.
Please be aware that changes made to the customers in Fortnox is not reflecting on the customer in TimeLog.
2 Customers are created in Fortnox
When you choose this option, is all new customers in Fortnox to get imported manually in the Link customer configuration section, and you are to find the new Fortnox customer link tables as described in step 2.
Transfer invoice specification to Fortnox
Activate "Transfer invoice specification to Fortnox" if the TimeLog invoice specification is to be transferred together with the invoices to Fortnox.
The TimeLog invoice specification is an PDF file that include all registrations added to the TimeLog invoice. The PDF is added to Attached files (Kopplade filer) and you must activate Include on print (Inkludera vid skicka) on the Fortnox invoice if your customer is to receive the specification when sending the invoice to the customer.
Reset integration
REST integration is only to be used if you want to completely disconnect the integration and remove all link information between TimeLog and the Fortnox installation.
Click Next
Step 2 – Link customers
To be able to transfer invoices to Fortnox, all customers must be found in TimeLog and linked to the corresponding customer names in Fortnox. This is done in the table of customers, which has four display options (One match, More matches, No match & Ignored customers).
The left half of the table shows the Fortnox customers, and the right half the TimeLog customers, and TimeLog is checking on the customer number, VAT number, phone number and customer name to find matching customer.
Before the integration is activated, it is important to handle all the Fortnox customers in the first three table view options. Please be aware that the Fortnox table section is only showing up to 200 customer names at the time. After you have linked/ignored Fortnox customers in the table, is the table updated with new customer names after click on OK.
Table view options
One match. Customer pairs that can be linked immediately.
More matches: Customers in Fortnox where more than one matching customer has been found in TimeLog.
No match: Customers in Fortnox where there is no match in TimeLog.
Ignored Customers: Customers in Fortnox that should not be used in TimeLog. You can ignore customers in all three table view options.
On all four table view options, there are four options for linking the customer information:
- Link and use data from TimeLog: This action links the customer pairs and overwrites customer data in Fortnox with customer data from TimeLog including the customer number, if you have activated the use of TimeLog customer number series. Fields that are not filled out in TimeLog will not be transferred.
- Link and used data from Fortnox: This action links the customer pairs and overwrites customer data in TimeLog with customer data from Fortnox including the customer number. Fields that are not filled in in Fortnox are not overwritten in TimeLog.
- Import to TimeLog as new customer: This action creates a new customer in TimeLog based on data in the Fortnox customer including the Fortnox customer number.
- Ignore Customer(s): This action ignores the customers from Fortnox and puts them into their own table. The customer names can subsequently be imported into TimeLog if the need arises.
When you have imported the new customers in TimeLog, the customer number from Fortnox is also imported to the customer in TimeLog. If you want TimeLog to be the master for new customers, we recommend that you correct your customer number series in System administration -> General settings -> Number series, so that the new customers you create in TimeLog get a customer number that continues the number series in Fortnox. In this way, the customer numbers in the two systems will be the same.
The procedure for the chaining depends on one of the following typical scenarios:
- There is no customer data in either Fortnox or TimeLog
- There is customer data in Fortnox and none in TimeLog (new TimeLog customer)
- There is customer data in TimeLog and none in Fortnox (new Fortnox customer)
- There is customer data in both TimeLog and Fortnox
Below, the four scenarios are reviewed separately.
Scenario 1: There is no customer data in either Fortnox or TimeLog
In this case, linking of the customer databases is not necessary, so the point can be skipped. If Fortnox is selected as master (From Fortnox to TimeLog) for new customers in the Setup section, is new Fortnox customers to be imported via the table view option No match, and use the option Imported to TimeLog as new customer.
If TimeLog is selected as master (From TimeLog to Fortnox), the customers are created and linked in Fortnox when the first invoice is transferred.
Scenario 2: There is customer data in Fortnox and none in TimeLog
Table display option One match and More matches will be empty and can be skipped. Start by transferring the relevant customers in Fortnox to TimeLog. When the table shows No match, all active customers in Fortnox will be displayed. Mark the customers to be created in TimeLog and select Import to TimeLog as new customer under Select action and click OK.
The customers are now created in TimeLog, and at the same time they are linked to Fortnox's customer database. The new customers in TimeLog get the customer number from Fortnox.
Scenario 3: There is customer data in TimeLog and none in Fortnox
In this case, there is no concatenation to perform, so the point can be skipped. Customers will be created in Fortnox in connection with invoicing if TimeLog is the master for new customers.
If Fortnox is the master, the customer must be created in Fortnox and linked via the table view option No match.
Scenario 4: There is customer data in both TimeLog and Fortnox
This connection is the most time-consuming, as there will be a need to manually connect the individual customer pairs. Fortunately, the system helps to find customer pairs that match.
Please be aware that the Fortnox table section is only showing up to 200 customer names at the time, and it is an advantage to link/ignore groups of customers so that the list is continuously updated/shortened.
When you have finished handling all the customers, click Next to continue setting up the integration.
Ignore customers
You have the option to ignore Fortnox customers in all three table view options.
You ignore the customers by marking the checkboxes on the far right and selecting Ignore customer(s) in Select action and clicking OK.
When you ignore the customers, they are moved to the Ignore customer(s) table, where you get an overall overview. From here you have the option to import or link them if you need them later.
Step 3 – Import product numbers
In this configuration section, are you to activate the product numbers that is to be used on the invoice lines in TimeLog.
Fortnox requires that each invoice line is printed with a product number, which determines how the invoice line should be posted in the accounts with respect to VAT and turnover statistics. If a product number has not been selected on one invoice line in TimeLog, the invoice draft cannot be posted, and only posted TimeLog invoices can be transferred to Fortnox.
You will find the table of active Fortnox product numbers at the bottom of the webpage. Mark the check box next to the product numbers to be used on your invoice lines in TimeLog. The selection is activated by selecting the Activate action and clicking OK to activate the number in TimeLog.
You can also click directly on Inactive in the Status column to activate the individual product number.
Configuration of product numbers
After activating your product numbers are you able to configure pre-selected product number to the different project registrations.
Configuration of product numbers has two setups that make invoice creation easier.
- Default product numbers for project work
- Standard product numbers on expenses
By default, the product number must be selected on the individual invoice line. For each data type and form of settlement in TimeLog, you can choose a principle for the default selection. You also have the option of choosing a specific product number for the individual data type.
Creation of the invoice drafts works fine, even if the setup of default product numbers has not been completed. In that case, you must manually select a product number on each invoice line on the invoice draft.
We recommend setting up default product numbers, as it will save you a lot of time in the invoicing process when TimeLog adds the selected product numbers to the individual invoice lines for you. This is especially an advantage if there are many of you who must share the responsibility of creating invoices.
Setting up default product numbers for project work
When assigning product numbers to the different data types (time & material and fixed price payments), you have different options, depending on the data type.
Time & material: Has six possible choices: Select when invoicing, Select dimension (Project type, Project category, Task type or Hourly rate) or one of the imported product numbers.
Select when invoicing: Here, the product number must be selected on the individual invoice line when you create your invoices.
Select dimension: Here, the selected dimension must subsequently be updated in System administration -> Finance -> Product number mapping.
If Hourly rate is selected, your hourly rates in System administration -> Finance -> Hourly rates will have an extra field added (Product no.). Click on an hourly rate name or edit and select a product number. The same product number can be used for several hourly rates and new time tracking will automatically get the product number. If it is not possible to select a single product number for an hourly rate, it can be omitted and must instead be selected on the individual invoice lines.
If a specific product number is selected: Time registrations will automatically have the selected product number added to the invoice lines.
Fixed price: Has four possible choices: Select when invoicing, Select dimension (Project type and Project category) or one of the imported product numbers.
Select when invoicing: Here, the product number must be selected on the individual invoice line when you create your invoices.
Select dimension: Here, the selected dimension must subsequently be updated in System administration -> Finance -> Product number mapping. Fixed price payments will then automatically get the product number added when a new fixed price contract is created.
If a specific product number is selected: The fixed price payments will automatically have the selected product number added to the payments when a new fixed price contract is created.
Setting up standard product numbers on expenses
Expenses: Has three possible choices: Select when invoicing, Expense type or one of the imported product numbers.
Select when invoicing: Here, the product number must be selected on the individual invoice line when you create your invoices.
If Expense type is selected, your expense types must subsequently be assigned a product number in System administration -> Finance -> Product number mapping. Click on the expense type name or Edit icon and select a product number. It is not recommended to use the same product number on more than one expense type as this will affect the import of project expenses. If it is not possible to select a single product number for the expense type, it can be omitted and must instead be selected on the individual invoice lines.
Mileage: Has two possible choices: Choose when invoicing, or one of the imported product numbers.
Allowance: Has two possible choices: Choose when invoicing, or one of the imported product numbers.
Accommodation: Has two possible choices: Choose when invoicing, or one of the imported product numbers.
Change predefined mappings.
The functionality on this button is to be used if you have added a new product number in Fortnox and want to update not yet invoiced project registrations with the new product number.
After activating the new Fortnox product number and added the new product number to an datatype (project work and/or expense) you click on the button Change predefined mappings and checkmark the datatype that is to get updated when clicking on Confirm.
Consult the linked document Change predefined mappings (Link: )for more information.
Click Next to proceed to the next configuration section.
Step 4 – Expenses
Configuration of expense export
After activating the expense export, you must select which journal TimeLog should transfer the project expenses to in your Fortnox. You are then able to transfer the expenses that your employees enter in TimeLog, e.g. via our Mobile app, to Fortnox, including the attachment for the expense.
For the expenses to be transferred, you must add the corresponding financial account number from Fortnox to all expense types in TimeLog. The addition of financial accounts is carried out in System administration -> Time and expense registration -> Expense types.
Configuration of expense import
After activating the expense import, you must add the financial accounts from which TimeLog must import purchase invoices from. Click in the field and click on the desired financial accounts, after which the account is added.
All purchase invoices posted to these accounts can be imported into TimeLog via the Import project expenses web page and added to your projects in TimeLog. To optimize the import of purchase invoices, you should add the corresponding account numbers from Fortnox to all active expense types in TimeLog. If the purchase invoices also contain a TimeLog project number is TimeLog automatically adding it in the import table.
Click Next to proceed to the next configuration section.
Step 5 - Projects
For TimeLog to be able to add the projects in your Fortnox will you need to activate the project module in Setup >> Accounting >> Project (Inställninger >> Bokföring >> Projekt) in your Fortnox installation. Once you have activated the project module, will TimeLog automatically transfer the project names and numbers, comment, start and end date, and project manager to Fortnox when they are created in TimeLog.
Updates to the above project information is automatically getting added to the linked project when saved.
Please be aware that Fortnox project numbers has a limitation of 20 characters and accept lower- and upper-case letters.
The valid characters are: a-zåäöA-ZÅÄÖ0-9/-_+
When TimeLog has transferred a project to Fortnox, it can be selected on your purchase invoices. The Timelog Import of project expenses will then automatically show which project the purchase invoice is to be imported into TimeLog.
Click Next to proceed to the next configuration section.
Step 6 – Configuration of dimensions
In this configuration section you can configure how and if TimeLog dimensions should map to cost centres in Fortnox.
For TimeLog to transfer invoices with selected dimensions to Fortnox cost centres, the TimeLog dimension must be created in the Fortnox cost centre before the transfer. Please note that the code field in both TimeLog and Fortnox may contain a maximum of 6 characters.
Linking of TimeLog invoice dimensions
Here, you select which of the main measures from the TimeLog invoice will be transferred to Fortnox cost centres.
It is only possible to choose one TimeLog dimension (Project or Departments) for transfer to Fortnox cost centres.
TimeLog Invoice line mapping
Here, you select which dimension of the invoice row in TimeLog should be transferred to Fortnox cost centres. Once one of the three configuration options is selected, TimeLog will add the Cost Centre column to the invoice draft beside the column for product numbers, displaying the chosen dimension.
If you have added several registrations to an invoiced row, a conflict will arise, and you must select which dimension the invoice row will be assigned to. Note that an invoice cannot be posted if it lacks a dimension or product number.
Cost Centre for Invoice rows with payments and Project Costs
Fixed-price payments and project costs are not linked to the employee’s name, so you must choose which TimeLog information to add to the invoice row to transfer the invoices to your Fortnox setup. The three configuration options do not affect the invoice rows until you have selected a cost centre in one of the three configuration options under "Mapping TimeLog Invoice Rows."
Cost centre for invoice lines with payments and project expenses
Payments and project expenses do not have an associated employee, making it challenging for the system to determine the correct employee no. or department for cost centre assignment. This setting allows you to specify how cost centres should be assigned for invoice lines involving payments and project expenses when "Employee no." or "Employee's department" invoice line dimension is selected. The three configuration options do not affect the invoice rows until you have selected a cost centre in one of the three configuration options under "Mapping TimeLog Invoice Rows."
- Use invoice's department on invoice line as cost centre
When you select this setting, TimeLog will automatically add the invoice department to invoice rows with fixed prices and project costs. It is not possible to summarize (combine) different registration types, but you can select another department for the individual invoice row. - Use department of payment's project or project expense's project on invoice line as cost centre
When you select this setting, TimeLog will automatically add the project’s department to invoice rows with fixed prices and project costs. It is not possible to summarize (combine) different registration types, but you can select another project for the individual invoice row. - Manually select cost centre from standard options
When you select this setting, you must choose the desired dimension name for the invoice rows containing fixed-price payments and project expenses. Only the selected dimension options for the invoice row (TimeLog invoice line mapping) can be chosen.
Please note that department names/numbers and the employee’s name/ID number must be the same in TimeLog and Fortnox cost centres.
You create and update your TimeLog departments in System Administration >> General Settings >> Departments.
Employee IDs are activated in System Administration >> Employees and are added to the employee profile. The Employee ID must be the same as the Employment ID in Fortnox and the payroll system.
It is not recommended to combine time entries from multiple employees on a single invoice row, as only one employee can be selected per invoice row in the Cost Centre column.
Activate the integration
Click Activate to activate the integration and you are ready to transfer the first invoices to Fortnox, and you can update the integration at any time if changes/additions are needed.
If you have several legal entities in your TimeLog installation that are to be integrated into a finance integration, you must add and configure an integration for each legal entity in TimeLog.
Please give it a thumbs up or down.
Please write a comment.